By now, we all know Oracle is fully supported on VMware. Anyone telling you it’s not supported is either lying to you, or doesn’t know what he is talking about (I keep wondering what’s worse).
VMware support includes Oracle RAC (if it’s version 11.2.0.2.0 or above). However, Oracle may request to reproduce problems on physically deployed systems in case they suspect the problem is related to the hypervisor. The support note says:
Oracle will only provide support for issues that either are known to occur on the native OS, or can be demonstrated not to be as a result of running on VMware.
In case that happens, I recommend to contact VMWare support first because they might be familiar with the issue or can escalate the problem quickly. VMware support will take full ownership of the problem. Still, I have met numerous customers who are afraid of having to reproduce issues quickly and reliably on physical in case the escalation policy does not help. We need to get out of the virtual world, into reality, without making any other changes. How do we do that?
Unfortunately, no one can be told what the Matrix is. You have to see it for yourself.
(Opens a pillbox, empties the contents into his palms, and outstretches his hands)
This is your last chance. After this, there is no turning back.
(opens his right hand, to reveal a translucent blue pill)
You take the blue pill, the story ends, you wake up in your bed and believe whatever you want to believe.
(opens his left hand, revealing a similarly translucent red pill)
You take the red pill, you stay in Wonderland, and I show you how deep the rabbit hole goes.
– Morpheus, The Matrix (1999)
 Let’s stay in database Wonderland but with a real, not virtual, view of the world.
One of the issues is that a database can be quite large and if the database uses VMDK files on VMFS, a physical host can not mount those volumes to be able to use that data – VMFS is part of the VMware kernel and not available as a file system within Linux (or any other OS for that matter). An alternative that is often suggested is using RDM (Raw Device Mappings) which allows VMware virtual machines to use SAN volumes directly without VMware’s VMFS file system in between. Although RDMs have advantages (most notably it makes EMC storage replication a lot easier) this causes some administration overhead and is not always preferred by administrators, especially for many small- and medium sized databases. Some of the white papers recommending RDMs for this purpose, also suggest you build an Oracle RAC cluster with (by default) virtual nodes but with the option of adding physical nodes when needed – allowing you to migrate easily between full virtual and full physical deployments. Of course this requires you to deal with the complexity and overhead of RAC to begin with (not even mentioning the high additional license cost). Many of the customers I’ve spoken to have a large number of databases where only a few run Oracle RAC and they prefer to use VMFS for at least a number of their databases.
VMFS volumes would thus normally require the data to be migrated on physical volumes first before a physical host could mount and use the volumes. That takes precious time and effort, and involves risk of running into issues – exactly the kind of thing you don’t need when dealing with other serious production problems!
But maybe… just maybe you don’t have to move that data at all…
Let’s see if we can outsmart Oracle’s support policies and use a virtual machine’s data on VMDK volumes on a physical host. This requires that the virtual and physical machine have similar architectures and OS installed, so that the physical machine could run the database if it had access to the data. But… that was the requirement anyway even if you would physically migrate the data to the physical machine.
The method we are going to use is a storage networking protocol called iSCSI. Basically iSCSI allows you to present a block device (disk) over an IP network to another host. So what we are going to do is set up the “production” virtual machine as an iSCSI target (server) and the “physical” machine as an iSCSI initiator (client). Sounds complicated? Let’s run through the setup and see.
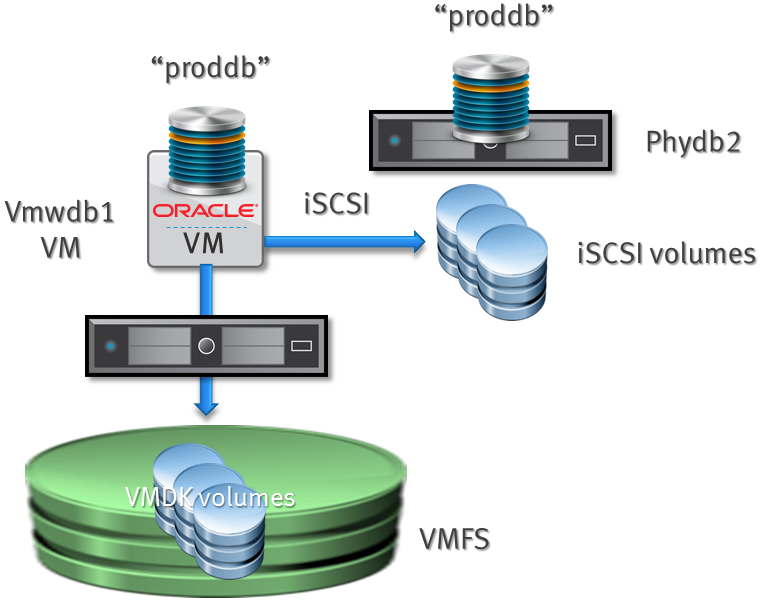
For the sake of this test I have two virtual machines running under VMware ESXi 5.1. “vmwdb1” is the live database server that is supposed to have a production problem of which the issue is suspected to be the hypervisor. The other, “phydb2” is actually a clean virtual machine without databases – but with Oracle ASM and the grid component installed and configured. We will pretend “phydb2” is a physical host without the capability of opening VMware VMFS/VMDK files. Of course you need network access between the machines (if performance is an issue you might as well have a fast LAN backbone).
Other configuration details:
Both VMs: 2 vCPU each, 4GB mem each
OS: CentOS 6.4 (compatible with Red Hat 6.4 and Oracle Enterprise Linux 6.4)
Boot volume: 20GB
Server 1
Hostname: vmwdb1
Database: 11.2.0.3.0.
Database name: proddb
SGA: 1 GB
Disk setup:
# asm list
disk: /dev/sda  [0:0:0:0]  20.00 GB in use (has partitions)
disk: /dev/sdb  [0:0:1:0]   4.00 GB asm volume /dev/oracleasm/admn
disk: /dev/sdc  [0:0:3:0]   4.00 GB asm volume /dev/oracleasm/tmp2
disk: /dev/sdd  [1:0:0:0]   8.00 GB asm volume /dev/oracleasm/dat1
disk: /dev/sde  [1:0:1:0]   8.00 GB asm volume /dev/oracleasm/dat2
disk: /dev/sdf  [2:0:0:0]   3.00 GB asm volume /dev/oracleasm/rdo2
Application: Swingbench
Filesystem for Oracle stuff: mounted as /oracle
ASM is managed by a script I created that mimics ASMLib commands.
In a moment of sheer inspiration I called my script “asm” 😉
This because ASMlib is no longer supported by Oracle under Red Hat / CentOS 6.4 (and not using ASMlib has some advantages). All VMDK volumes reside on a few SATA disks in my test server (this test is to show functionality, not make it to guinness book of records).
Here is a screenshot of Swingbench (actually minibench) running against the virtual machine’s database:
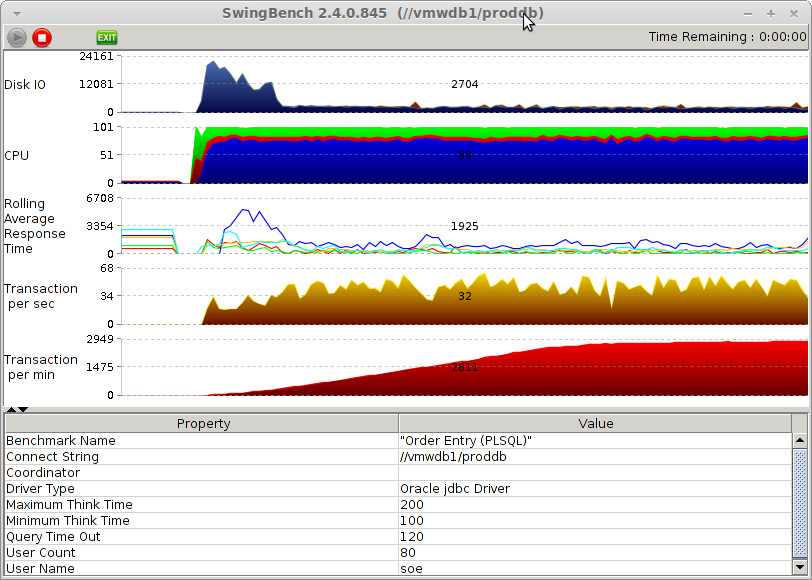
Swingbench uses the standard Order Entry benchmark with User defined scale = 2. This will create about 6,5 GB datasize. I had partitioning and bigfile tablespace enabled and created all SB data on diskgroup “+DATA”.
Server 2
Hostname: phydb2
Database: 11.2.0.3.0 (only binaries installed, no database)
ASM diskgroups:
None (but 1 LUN visible as /dev/oracleasm/foo)
Now we want to access the database on “vmwdb1” from “phydb2”, start it up and open it for processing. This requires a few steps:
– An ORACLE_HOME should be available with the correct version of the software
– ASM diskgroups should be visible on the target host
– Some startup settings need to be provided (i.e. init.ora, oratab and the like).
Let’s start with ORACLE_HOME. Remember we are troubleshooting operational problems so ideally we want the same ORACLE_HOME as we use in production. This guarantees we don’t silently introduce new problems due to different patch levels, or otherwise magically eliminate issues by the same means.
Our “prod” server has an /oracle file system, ORACLE_HOME sits under /oracle/base/db and ORACLE_HOME of ASM (GRID) sits under /oracle/grid.
Let’s NFS mount ORACLE_HOME on the target so we use the exact same binaries. This requires that the prod host exports the ORACLE_HOME as NFS. How to do this:
set up an entry in /etc/exports for the ORACLE_BASE
# cat /etc/exports
/oracle/base/ 192.168.0.0/255.255.128.0(rw,sync,no_subtree_check,no_root_squash)
Make sure nfs services are enabled and disable NFS v4 (avoid problems with user rights etc)
# chkconfig nfs on
# vi /etc/sysconfig/nfs
# Turn off v4 protocol support
RPCNFSDARGS="-N 4"
start NFS services
# service nfs start
Starting NFS services:                                     [  OK  ]
Starting NFS mountd:                                       [  OK  ]
Stopping RPC idmapd:                                       [  OK  ]
Starting RPC idmapd:                                       [  OK  ]
Starting NFS daemon:                                       [  OK  ]
On the target server
We already have an ORACLE_HOME for ASM/grid and another one for database services. However, we want to replace the one for database with the NFS shared version of our prod server. Assuming we don’t have any databases running on the target server:
# mv /oracle/base/ /oracle/base_temp
# mkdir /oracle/base
# mount vmwdb1:/oracle/base /oracle/base
# df /oracle/base
Filesystem           1K-blocks      Used Available Use% Mounted on
vmwdb1:/oracle/base   10079232   7419904   2556928  75% /oracle/base
Now let’s deal with the ASM volumes.
Setup iSCSI target (prod host)
First we need to install the scsi target utilities:
# yum install -y scsi-target-utils
Now we set up an iSCSI environment with CHAP authentication. First uncomment the “include” line in targets.conf:
# vi /etc/tgt/targets.conf
# This one includes other config files:
include /etc/tgt/temp/*.conf
We have to set an iSCSI name which is normally “iqn.<year-month>.domain:targetname” – let’s use “iqn.2013-09.local:target01” to keep things simple. In large iSCSI deployments naming needs to be a bit more sophisticated but for now this will do just fine.
We can make a separate file with our iSCSI volumes in /etc/tgt/temp/asm.conf without messing around with the targets.conf (that file might be overwritten during OS updates). Let’s see which volumes we have under /dev/oracleasm and add them all as iSCSI target.
# ls -d /dev/oracleasm/*
/dev/oracleasm/admn  /dev/oracleasm/dat1  /dev/oracleasm/dat2
/dev/oracleasm/rdo2  /dev/oracleasm/tmp2
# mkdir /etc/tgt/temp
# vi /etc/tgt/temp/asm.conf
<target iqn.2013-09.local:target01>
backing-store /dev/oracleasm/admn
backing-store /dev/oracleasm/dat1
backing-store /dev/oracleasm/dat2
backing-store /dev/oracleasm/rdo2
backing-store /dev/oracleasm/tmp2
initiator-address 192.168.2.13
incominguser oracle oracle
</target>
Note that we use oracle/oracle here as iSCSI userid/password. In real production environments you might want to use a more secure combi. The only host allowed to get access to the iSCSI volumes is the one using the specified “initiator address” (in our case this is the “physical” host).
Make sure “tgtd” gets started each time we reboot and start it now:
# chkconfig tgtd on
# service tgtd start
Starting SCSI target daemon:                               [  OK  ]
# tgtadm --mode target --op show
Target 1: iqn.2013-09.local:target01
System information:
Driver: iscsi
State: ready
I_T nexus information:
LUN information:
LUN: 0
Type: controller
SCSI ID: IET     00010000
SCSI SN: beaf10
Size: 0 MB, Block size: 1
Online: Yes
Removable media: No
Prevent removal: No
Readonly: No
Backing store type: null
Backing store path: None
Backing store flags:
Account information:
oracle
ACL information:
192.168.2.13
You can see that there are no iSCSI devices presented. This is because ASM and the database are currently still running and keep the devices locked. Note that on my system I have the linux firewall disabled – if you have it enabled, make sure you enable network access to the iscsi port 3260.
Let’s stop the database and ASM and refresh the iSCSI configuration:
$ srvctl stop database -d proddb
$ srvctl stop asm -f
# service tgtd reload
# tgtadm --mode target --op show
Target 1: iqn.2013-09.local:target01
System information:
Driver: iscsi
State: ready
I_T nexus information:
...
LUN: 1
Type: disk
SCSI ID: IET     00010001
SCSI SN: beaf11
Size: 4295 MB, Block size: 512
Online: Yes
Removable media: No
Prevent removal: No
Readonly: No
Backing store type: rdwr
Backing store path: /dev/oracleasm/admn
Backing store flags:
...
LUN: 5
Type: disk
SCSI ID: IET     00010005
SCSI SN: beaf15
Size: 4295 MB, Block size: 512
Online: Yes
Removable media: No
Prevent removal: No
Readonly: No
Backing store type: rdwr
Backing store path: /dev/oracleasm/tmp2
Backing store flags:
Account information:
oracle
ACL information:
192.168.2.13
So now all ASM volumes are present.
Now let’s setup the target (physical). Set the initiator name and set CHAP with userid/password in the iscsi configuration:
# vi /etc/iscsi/initiatorname.iscsi
InitiatorName=iqn.2013-09.local:target01
InitiatorAlias=initiator01

# vi /etc/iscsi/iscsid.conf
# To enable CHAP authentication set node.session.auth.authmethod
# to CHAP. The default is None.
node.session.auth.authmethod = CHAP

# To set a CHAP username and password for initiator
# authentication by the target(s), uncomment the following lines:
node.session.auth.username = oracle
node.session.auth.password = oracle
Now let’s discover the target and login:
# iscsiadm --mode discovery -t sendtargets --portal vmwdb1
Starting iscsid:                                           [  OK  ]
192.168.2.11:3260,1 iqn.2013-09.local:target01
# iscsiadm --mode node --targetname iqn.2013-09.local:target01 --portal vmwdb1 --login
Logging in to [iface: default, target: iqn.2013-09.local:target01, portal: 192.168.2.11,3260] (multiple)
Login to [iface: default, target: iqn.2013-09.local:target01, portal: 192.168.2.11,3260] successful.

# dmesg| tail -100
...
scsi4 : iSCSI Initiator over TCP/IP
scsi 4:0:0:0: RAID              IET      Controller       0001 PQ: 0 ANSI: 5
scsi 4:0:0:0: Attached scsi generic sg3 type 12
scsi 4:0:0:1: Direct-Access     IET      VIRTUAL-DISK     0001 PQ: 0 ANSI: 5
sd 4:0:0:1: Attached scsi generic sg4 type 0
scsi 4:0:0:2: Direct-Access     IET      VIRTUAL-DISK     0001 PQ: 0 ANSI: 5
sd 4:0:0:2: Attached scsi generic sg5 type 0
sd 4:0:0:1: [sdc] 8388608 512-byte logical blocks: (4.29 GB/4.00 GiB)
scsi 4:0:0:3: Direct-Access     IET      VIRTUAL-DISK     0001 PQ: 0 ANSI: 5
sd 4:0:0:3: Attached scsi generic sg6 type 0
sd 4:0:0:2: [sdd] 16777216 512-byte logical blocks: (8.58 GB/8.00 GiB)
scsi 4:0:0:4: Direct-Access     IET      VIRTUAL-DISK     0001 PQ: 0 ANSI: 5
sd 4:0:0:4: Attached scsi generic sg7 type 0
sd 4:0:0:1: [sdc] Write Protect is off
...
sde:
sdf:
sdg: unknown partition table
unknown partition table
unknown partition table
unknown partition table
unknown partition table
sd 4:0:0:3: [sde] Attached SCSI disk
sd 4:0:0:4: [sdf] Attached SCSI disk
sd 4:0:0:1: [sdc] Attached SCSI disk
sd 4:0:0:5: [sdg] Attached SCSI disk
sd 4:0:0:2: [sdd] Attached SCSI disk
# ls -al /dev/sd*
brw-rw---- 1 root disk 8,  0 Sep 17 09:46 /dev/sda
brw-rw---- 1 root disk 8,  1 Sep 17 09:46 /dev/sda1
brw-rw---- 1 root disk 8,  2 Sep 17 09:46 /dev/sda2

brw-rw---- 1 root disk 8, 32 Sep 17 10:18 /dev/sdc
brw-rw---- 1 root disk 8, 48 Sep 17 10:18 /dev/sdd
brw-rw---- 1 root disk 8, 64 Sep 17 10:18 /dev/sde
brw-rw---- 1 root disk 8, 80 Sep 17 10:18 /dev/sdf
brw-rw---- 1 root disk 8, 96 Sep 17 10:18 /dev/sdg
You see 5 new disks appeared on the system. The remarks about unknown partition table is correct, we don’t partition ASM volumes.
Now I use my “asm” script to make these ASM devices appear under /dev/oracleasm. But first a special note on how this works. I use the Linux “udev” facility to get consistent device naming and my “asm” script uses the “SCSI identifier” to recognize disks even if they get different names between reboots. So a disk now listed as /dev/sdd might become /dev/sdf after reboot and so on. But the SCSI id does not change. You can see the scsi id using the “scsi_id” tool, but that requires the /etc/scsi_id.config to be set correctly. Without these settings “scsi_id” will report empty scsi IDs.
# vi /etc/scsi_id.config

# allow scsi_id /dev/sdX reporting
# Also set disk.EnableUUID = "true" in VMware VMX file for this to work
# whitelisted and replace-whitespace is required for iscsi initiator compatibility
options=-g --whitelisted --replace-whitespace

# scsi_id /dev/sda
36000c29794d2bbd16cf370a62bd72236
# scsi_id /dev/sdc
1IET_00010001
# scsi_id /dev/sdg
1IET_00010005

# asm createdisk iscsi1 /dev/sdc
running createdisk iscsi1 /dev/sdc
iscsi1 1IET_00010001
Please review /etc/asmtab and reconfigure udev with "asmupdate" when done
Then check /dev/oracleasm or /dev/iorate for the new volume.
It should be disappeared from /dev
[root@phydb2 ~]# asm createdisk iscsi2 /dev/sdd
running createdisk iscsi2 /dev/sdd
iscsi2 1IET_00010002
...
# asm createdisk iscsi3 /dev/sde
running createdisk iscsi3 /dev/sde
iscsi3 1IET_00010003
...
# asm createdisk iscsi4 /dev/sdf
running createdisk iscsi4 /dev/sdf
iscsi4 1IET_00010004
...
# asm createdisk iscsi5 /dev/sdg
running createdisk iscsi5 /dev/sdg
iscsi5 1IET_00010005
...
# asm scandisks
# ls -l /dev/oracleasm/*
brw-rw---- 1 grid asmdba 8, 16 Sep 17 10:25 /dev/oracleasm/foo
brw-rw---- 1 grid asmdba 8, 32 Sep 17 10:25 /dev/oracleasm/iscsi1
brw-rw---- 1 grid asmdba 8, 48 Sep 17 10:25 /dev/oracleasm/iscsi2
brw-rw---- 1 grid asmdba 8, 64 Sep 17 10:25 /dev/oracleasm/iscsi3
brw-rw---- 1 grid asmdba 8, 80 Sep 17 10:25 /dev/oracleasm/iscsi4
brw-rw---- 1 grid asmdba 8, 96 Sep 17 10:25 /dev/oracleasm/iscsi5
[root@phydb2 ~]# ls -l /dev/sd*
brw-rw---- 1 root disk 8, 0 Sep 17 10:25 /dev/sda
brw-rw---- 1 root disk 8, 1 Sep 17 10:25 /dev/sda1
brw-rw---- 1 root disk 8, 2 Sep 17 10:25 /dev/sda2
# cat /etc/asmtab
# This file is the source for asm disks (without ASMLib) in Oracle
# Enter on each line:
# volname    scsi_id
#
# example:
# redo    36000c29f825cd85b5fcc70a1aadebf0c
# admn    36000c298afa5c31b47fe76cbd1750937
foo 36000c29706783fc9c5e6accdcc860e63
iscsi1 1IET_00010001
iscsi2 1IET_00010002
iscsi3 1IET_00010003
iscsi4 1IET_00010004
iscsi5 1IET_00010005
# asm list
disk: /dev/sda  [2:0:0:0]  20.00 GB in use (has partitions)
disk: /dev/sdb  [2:0:1:0]   4.00 GB asm volume /dev/oracleasm/foo
disk: /dev/sdc  [4:0:0:1]   4.00 GB asm volume /dev/oracleasm/iscsi1
disk: /dev/sdd  [4:0:0:2]   8.00 GB asm volume /dev/oracleasm/iscsi2
disk: /dev/sde  [4:0:0:3]   8.00 GB asm volume /dev/oracleasm/iscsi3
disk: /dev/sdf  [4:0:0:4]   3.00 GB asm volume /dev/oracleasm/iscsi4
disk: /dev/sdg  [4:0:0:5]   4.00 GB asm volume /dev/oracleasm/iscsi5
Note: asmtab is a special file I use myself to keep track of scsi identifiers versus device names under linux. It’s managed by the “asm” script. “asm list” shows the original (/dev/sdX) name, the SCSI ID (handy to figure out which VMDK file it is mapped to), the size and the new linux device name.
“asm” generates the correct rules for udev, as shown here:
# cat /etc/udev/rules.d/99-asm.rules
KERNEL=="sd*", SUBSYSTEM=="block", ENV{DEVTYPE}=="disk", OWNER="grid", GROUP="asmdba", MODE="0660", ENV{ID_SERIAL}=="36000c29706783fc9c5e6accdcc860e63", NAME="oracleasm/foo"
KERNEL=="sd*", SUBSYSTEM=="block", ENV{DEVTYPE}=="disk", OWNER="grid", GROUP="asmdba", MODE="0660", ENV{ID_SERIAL}=="1IET_00010001", NAME="oracleasm/iscsi1"
KERNEL=="sd*", SUBSYSTEM=="block", ENV{DEVTYPE}=="disk", OWNER="grid", GROUP="asmdba", MODE="0660", ENV{ID_SERIAL}=="1IET_00010002", NAME="oracleasm/iscsi2"
KERNEL=="sd*", SUBSYSTEM=="block", ENV{DEVTYPE}=="disk", OWNER="grid", GROUP="asmdba", MODE="0660", ENV{ID_SERIAL}=="1IET_00010003", NAME="oracleasm/iscsi3"
KERNEL=="sd*", SUBSYSTEM=="block", ENV{DEVTYPE}=="disk", OWNER="grid", GROUP="asmdba", MODE="0660", ENV{ID_SERIAL}=="1IET_00010004", NAME="oracleasm/iscsi4"
KERNEL=="sd*", SUBSYSTEM=="block", ENV{DEVTYPE}=="disk", OWNER="grid", GROUP="asmdba", MODE="0660", ENV{ID_SERIAL}=="1IET_00010005", NAME="oracleasm/iscsi5"
So now we have the original ORACLE_HOME and all ASM devices. Let’s make an entry in oratab to make DB startup a bit easier:
# echo proddb:/oracle/base/db:N >> /etc/oratab
Now we need to let ASM mount the diskgroups and start the database
SYS:+ASM > @asm-listdgs

NUM NAME        BLOCK      AU_MB STATE    TYPE     TOTAL_MB    FREE_MB USABLE_FILE_MB OFFLINE_DISKS
---------- ---------- ---------- ---------- ----------- ------ ---------- ---------- -------------- -------------
0 REDO         4096      0 DISMOUNTED            0       0          0        0
0 DATA         4096      0 DISMOUNTED            0       0          0        0
0 ADMN         4096      0 DISMOUNTED            0       0          0        0
0 TEMP         4096      0 DISMOUNTED            0       0          0        0
SYS:+ASM > alter diskgroup redo mount;
Diskgroup altered.
SYS:+ASM > alter diskgroup data mount;
Diskgroup altered.
SYS:+ASM > alter diskgroup admn mount;
Diskgroup altered.
SYS:+ASM > alter diskgroup temp mount;
Diskgroup altered.
# su - oracle
$ sqlplus / as sysdba
SQL*Plus: Release 11.2.0.3.0 Production on Tue Sep 17 10:41:42 2013
Copyright (c) 1982, 2011, Oracle.  All rights reserved.
Connected to an idle instance.
SYS:proddb > startup
ORACLE instance started.

Total System Global Area 1068937216 bytes
Fixed Size            2235208 bytes
Variable Size          629146808 bytes
Database Buffers      432013312 bytes
Redo Buffers            5541888 bytes
Database mounted.
Database opened.

Mission accomplished 🙂
(Neo reaches for the red pill)
Remember: all I’m offering is the truth. Nothing more.
– Morpheus, The Matrix (1999)
Let’s start Swingbench on the “physical” node to see if we get it working:
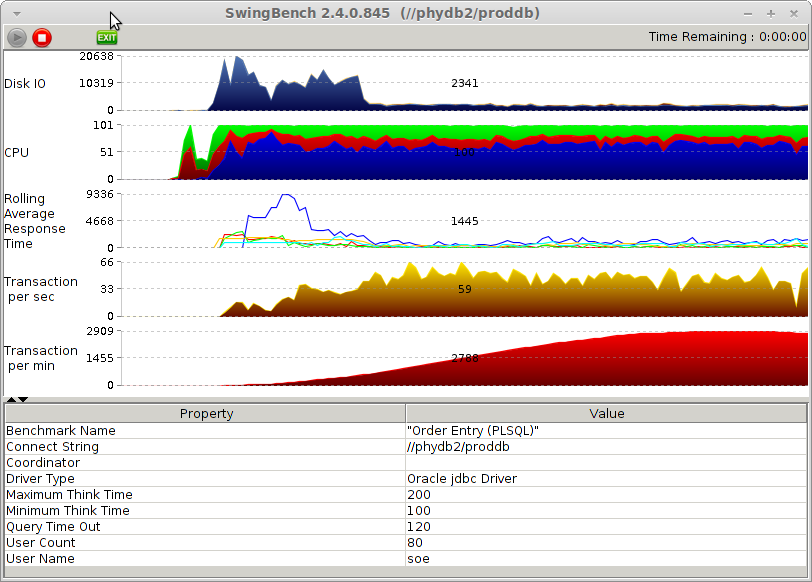
Note that we almost get the same transactions per minute as compared to the original benchmark.
Let’s cleanup and get back to the original state:
SYS:proddb > shutdown immediate;
...
$ srvctl stop asm -f
...
# iscsiadm -m node -u
Logging out of session [sid: 2, target: iqn.2013-09.local:target01, portal: 192.168.2.11,3260]
Logout of [sid: 2, target: iqn.2013-09.local:target01, portal: 192.168.2.11,3260] successful.
# iscsiadm -m session -o show
iscsiadm: No active sessions.
On the prod (virtual) host we can now restart ASM and the database:
$ srvctl start asm
$ srvctl start database -d proddb
Some additional thoughts:
- ASM will prevent starting on one server if the other one is active. Don’t worry about data corruption using this method.
- If you want to stay on physical you may use ASM migration to move the data (online) to local (physical attached) disk
- If your data is not using ASM but file systems (i.e. ext3) you can still use iSCSI remount but you need to mount the filesystems under the correct mountpoints yourself
- If you need to run the physical database directly as the new production environment you also need to change the IP and hostname settings. Before you do this make sure this doesn’t interfere with the IP connectivity between iSCSI target and initiator (i.e. use a different IP subnet for iSCSI where IP addresses don’t change)
- In a virtualized production environment you can prepare lots of these steps upfront (i.e. setting up iSCSI with a dummy volume, create scripts that quickly configure the ASM disks etc)
- If you want to keep production running as virtual, VMware has virtual disk cloning features that allow you to provide snapshots/clones next to the primary data. You may now provide iSCSI access to these clones instead of the real data. This has some advantages as I blogged about here: http://dirty-cache.com/2013/01/15/why-clone-db-firefighting/
The Oracle: You know why Morpheus brought you to see me?
Neo: I think so.
I think it’s because The Oracle wants to know if Neo lives in the virtual or physical world 😉
The Oracle: So, what do you think? Do you think you’re The One?
Neo: I don’t know.
(The latin phrase Temet Nosce appears on an inscription over the Oracle’s door)
The Oracle: You know what that means? It’s Latin. Means “Know thyself”. I’m going to let you in on a little secret. Being The One is just like being in love. No one can tell you you’re in love, you just know it. Through and through. Balls to bones.
– Neo and The Oracle, The Matrix (1999)
As long as The Oracle doesn’t know we’re in the virtual or physical world, things don’t matter. As long as we know ourselves, we’re good. But in case The Oracle finds out, you know what to do…
![]()
Bart, interesting and thorough blog. Thanks for sharing even though I’m reading 1 year later. You start your blog though by projecting a Oracle support statement that is demonstrative just to step back from it in the next paragraph. Unless you work for Oracle and in a position to state what they do or do not support, or can provide substantial proof then Oracle doesn’t “fully” support Oracle on VMware. They support Oracle with “qualifications” or “restrictions”. Enterprise workloads and the implicit support required for those workloads do not want to rely on “shoulda, coulda, woulda”. The integrity of your blog demands the facts and not the desire. Please tell me if you disagree. Keep the great content coming!
Good to hear from you again 🙂
To start with the proof that Oracle is supported on VMware, that’s Oracle Support note 249212.1. If Oracle says VMware is supported then who am I to doubt it…
The only reason that I am so outspoken is to make it very clear to our customers as one well-known vendor is *still* misleading customers on purpose.
FYI here’s a note from VMware basically saying the same thing: http://blogs.vmware.com/apps/2012/11/update-on-virtualizing-oracle.html (note the date – it’s been out for a while)
I fully agree that there are restrictions – which is in itself nothing special, every vendor provides support on their products within certain limits and requirements. No vendor provides unconditional support. The most basic restriction is that a certain minimum version is required but other restrictions could be that you need a certain driver, system configuration setting or some other item in the stack. A good example is EMC’s own support matrix where we go in deep detail on what is needed for support. It sometimes causes some complications during implementations but potentially saves you a lot of trouble later.
Some restrictions are real, some are perceived (in Oracle’s case, confusion is caused on purpose). The V2P (virtual to physical) is sort of an edge case, doesn’t happen very often but in case it needs to be done, I just wanted to provide a way to do it – even if it’s an indirect method.
If only to avoid delay in support during issues or to silence people who spread FUD.
Regards,
Bart